 TEXT ENCRYPTION TOOL
OVERVIEW
Text Encryption Tool (TET) provides a simple way to encrypt and decrypt text information with easy interfaces to Outlook 2003, Windows Default Mail handler and Web Mail via Clipboard
The Program utilizes Blowfish Encryption © David Ireland, DI Management Services Pty Ltd <http://www.di-mgt.com.au>.
Program was written using Visual Basic 2005 Express and
requires that you have Windows .Net Framework 2.0 installed. .Net provides a replacement for the older
windows API interface and provides a feature rich, secure environment for
program development. Get your copy here: Click.
The program provides Notepad like functionality for up to 16 pages of text information (total character size of the text is limited to 32767, and encrypted data takes 2 bytes for each byte of the message). Messages are stored only in memory unless you save them.
We suggest that you create an encrypted space on your hard drive to retain all the messages and keys associated with your encryption activities. This will provide a double layer of protection from third parties who may obtain access to your hard drive. We highly recommend the program “TrueCrypt”., available from http:/www.truecrypt.org/
With Text Encryption Tool, you can copy text, encrypted or unencrypted, from the screen display to a file, to the clipboard, or to your e-mail system. The program will automatically handle Outlook and the windows default mail handler. For web based e-mails, you would copy the message to clipboard, and paste it into the appropriate web screen.
Support for encrypted attachments is provided by a sister program, File Split’n’Join which can not only encrypt attachments, but can split large files into smaller chunks to bypass e-mail file size limits. You tell TET to use SplitnJoin in the Tools, Preferences menu, and then access Attachments menu item to encrypt or decrypt attachments (or any file for that matter!). At present, only one encrypted session can be stored in a single folder because the system only recognizes a single packing list. Each time you run a session, a new packing list is generated which if you used the same folder to hold the second run, the first packing list would be deleted.
When Split’n’Join is run through TET, TET controls the program and its features. You can also run Split’n’Join standalone and access more features independently. The difference is that you have to manually generate the E-mails and manually attach the file chunks to them if you do not go through TET. You would also have to be very careful to make sure you entered the keys correctly, as a single digit would make the file undecodable to the recipient.
Although all our programs use Blowfish encryption, it is not compatible with other implementations, and we do not even guarantee compatibility with prior or future releases of the Text Encryption Tool. Therefore, all the persons who will be sharing encrypted messages must be running the same version at the same time.
The program is based on a “public key” / “private key” model. You will establish one or more private keys. Private keys are used to decrypt all messages that come to you. For each private key, the system will generate a public key. The public key should be shared with anyone who may send you an encrypted message. They will enter your Public key to encrypt the message, and upon receipt, you will enter your. Keys are generated from Tools, Preferences menu.
When you receive a key from your friends, the Tools, Public Key Manager is the place to enter it. One public key is associated with one E-mail address at a time. Once a Public key is entered, you can select that Public key to encrypt messages to that e-mail address.
INSTALLATION
Just run the program, and it will lead you through the auto install with the following prompt:
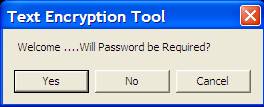
‘Yes’ means that anyone who tries to run the program on this computer will have to enter a password that is assigned by you. This prevents access to the program by just anyone.
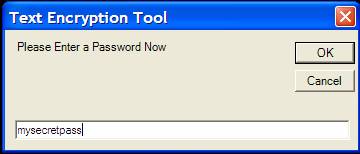
If you require a password, this is the next screen; put in the password
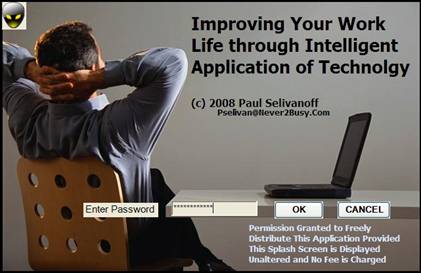
If you do not require a password, you will see the same screen, but with no input fields (called a splash screen), and it will go away in 5 seconds…
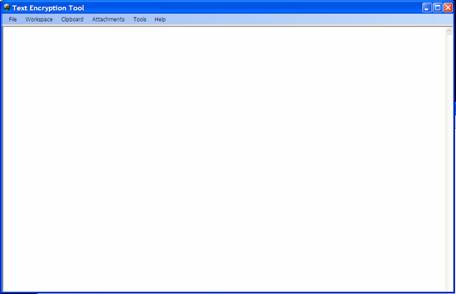
You will then come to this screen, which is the main working screen for all features of the program. Program is now ready for use:
First thing is set up preferences—Tools, Preferences:
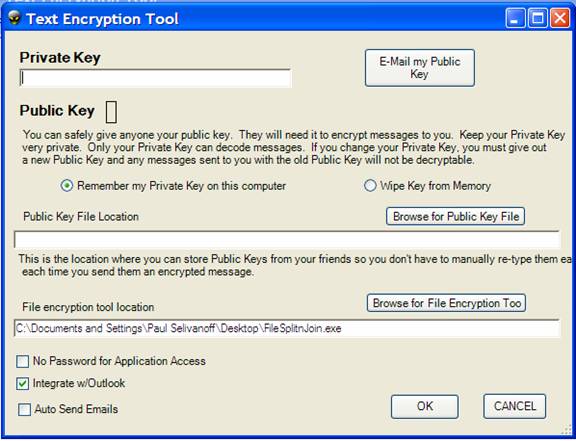
Private Key – any set of characters 4-16 digits long
When you exit this field, the system automatically generates the corresponding public key.
E-mail my public key – you can generate an automatic message to friends by clicking this button.
Remember my Private Key on this computer or Wipe Key from Memory –determines whether your private key is stored on the hard drive—allowing the program to default it when needed, rather than prompting you. For best security, do not check Remember my Private Key as this copies the key to a location on your hard drive and allows Decryption to be done without prompting you.
The Public Key File is an address book of keys and e-mail addresses for all your friends who you will be sending messages to. You use their public key to send them a message, they use their private key to decode the message and then they send you messages using your public key, which you decode using your private key.
If you use Outlook and wish to integrate with our Outlook based tool—put the public key file in the Application Data/Microsoft/Outlook folder.For extra security however, you should keep the keys on an encrypted drive.
If you plan to use Split’n’Join to encrypt attachments, browse for the file now so the system knows where to find it when it needs it.
No password for application access—this tool can be accessed without a password.
Integrate w/Outlook – check if you want to use Outlook 2003. The system will default to the default mail handler if unchecked. That could be Outlook as well.
Autosend – e-mails are created in the background and sent without display first. Only works when you click the Integrate w/Outlook button above first.
Installation is now complete.
USING TET
Works kind of like Notepad. You can mix encrypted text inside a non encrypted block of text by using the @BEGIN@ marker to denote when to start encrypting and the @END@ to denote when to stop.
For example, I could type:
Hello, my name is a
secret. This is my name:
@BEGIN@secret@END@ and more text can follow here.
When the ‘Workspace – Encrypt’ menu option is selected, the result will be:
Hello, my name is a
secret. This is my name:
@BEGIN@FFA10122AF2F0023AB3C4Dt@END@ and more text can follow here.
The text outside the @BEGIN@ @END@ is not encrypted. If no @BEGIN@ @END@ is found, the entire workspace is encrypted and @BEGIN@END@ is added on front and back.
Public Key Manager is automatically accessed anytime a public key is required. You can also access it directly from Tools, Public Key Manager.
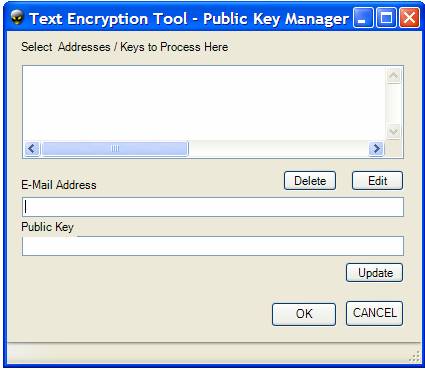
Ordinarily, you would select addresses set up and displayed in the top box. New addresses and keys are added in the text box called “E-mail Address” and “Public Key.” Click Update to save them and make them accessible.
Existing addresses and keys can be Edited or Deleted—simply check the address to select, and click the button, edit the item in the text boxes and click Update. Update is done by e-mail address—so if you Edit and change an address, it will Update as a new item. Then just go back and delete the original item.
When the application needs a Public Key—it will pop up this screen and you can scroll through and select the appropriate address/key combo.
Workspace text sent to clipboard can be recovered in the target application screen by selecting the location and finding the “Paste” menu item of the application, or use Ctrl-V anytime to paste. To move text from another application to the workspace—highlight the text in the other application, then use the application’s Edit – Copy feature or Ctrl-C to move the highlighted text to clipboard, then you can use TET menu or Ctrl-V to paste it.
Everything else is pretty self explanatory, except using File Split’n’Join, which is the subject of that application’s help file.
Questions/Comments can be addressed to info@never2busy.com
Visit our Web Site: http://www.never2busy.com